
Heavy rain is common in Whistler, and it can harm your roof. After such weather, it’s smart to do a roof inspection to spot any issues early. This helps prevent bigger problems and costly repairs later on.
In November 2021, a major storm caused severe flooding and landslides in the area, affecting many homes. More recently, in October 2024, another intense storm brought heavy rain and strong winds to Whistler. These events show how important it is to check your roof after heavy rain.
Regular roof inspections can find damage like leaks, missing shingles, or clogged gutters. Fixing these issues early keeps your roof in good shape and protects your home from water damage. It’s a simple step that can save you from expensive repairs in the future.
In this guide, we’ll show you how to safely inspect your roof after heavy rain in Whistler. By following these steps, you can keep your home safe and dry, even in the wettest weather.
Prepare for the Roof Inspection
Before starting a roof inspection after heavy rain in Whistler, it’s crucial to prioritize safety. Falls are a leading cause of injuries in construction, with over 40,000 incidents reported in Canada in 2023.
Gather Essential Safety Gear:
- Sturdy Ladder: Ensure it’s in good condition and placed on stable ground.
- Non-Slip Footwear: Wear shoes with good traction to prevent slipping.
- Safety Harness: Use a harness if you plan to climb onto the roof, especially on steep or high structures.
- Helmet and Gloves: Protect yourself from potential falling debris and sharp edges.
Check Weather Conditions:
- Only inspect your roof when it’s dry and calm. Wet or windy conditions increase the risk of accidents.
Have a Spotter:
- Ask someone to assist by holding the ladder and keeping an eye out for any hazards.
Know Your Limits:
- If you’re uncomfortable with heights or unsure about the process, consider hiring professionals. Many Whistler roofing companies offer free roof inspections, ensuring safety and thoroughness.
By taking these precautions, you can conduct a safe and effective roof inspection, identifying any issues caused by heavy rain.
Check from the Ground First
Before climbing up, start your roof inspection by looking for problems from the ground. This is the safest way to spot visible damage caused by heavy rain. Here’s what to do:
- Look for Missing or Damaged Shingles
Walk around your home and check if you can see shingles that are curled, cracked, or completely missing. Heavy rain and wind are common culprits for shingle damage, especially in Whistler’s stormy seasons. - Inspect Gutters and Downspouts
See if there’s debris or water overflowing. Clogged gutters can lead to water pooling on your roof, which weakens its structure over time. If you spot significant buildup, it’s time for a closer roof assessment or cleaning. - Watch for Sagging Areas
A sagging roof could be a sign of trapped moisture or structural damage. These areas need immediate attention to avoid further complications. - Check the Ground for Signs of Roof Damage
Look for pieces of shingles, nails, or other roofing materials that may have fallen during the storm. This is a clear indicator that your roof might need repairs. - Use Binoculars for a Closer Look
If you have a pair of binoculars, use them to check areas like the flashing around chimneys and vents. This way, you can inspect hard-to-reach spots without putting yourself at risk.
Remember, if you notice anything concerning during your ground-level inspection, you can opt for a drone roof inspection or contact a professional for a free roof inspection. Starting from the ground not only keeps you safe but also gives you a clear idea of any major issues before moving on to the next steps.
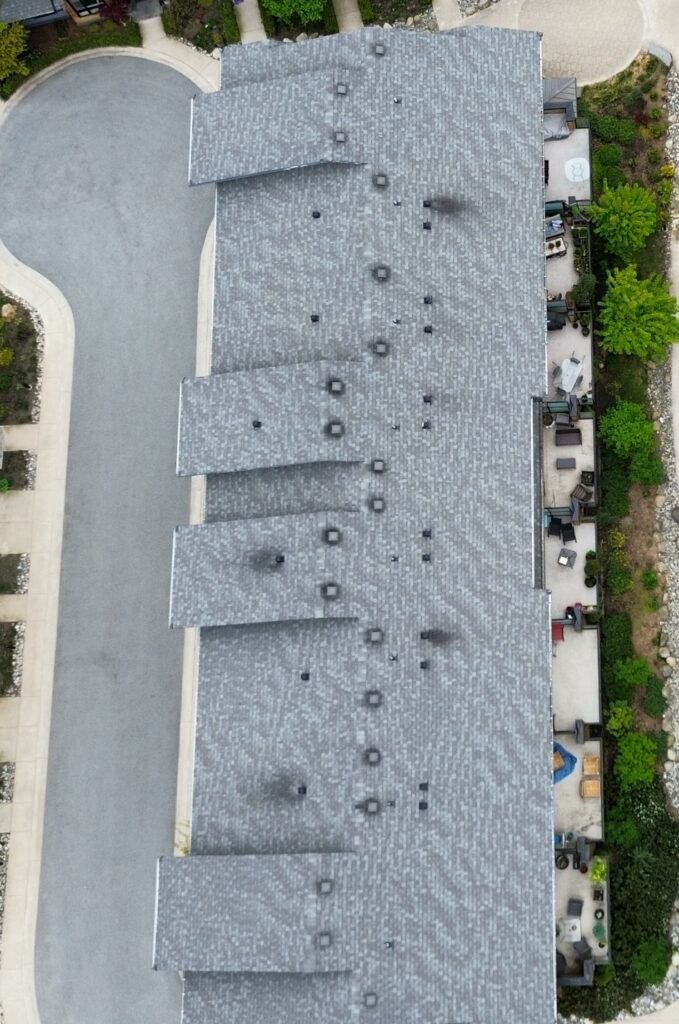
Use Technology: Drone Roof Inspection
Inspecting your roof safely doesn’t always mean climbing up. Thanks to advancements in technology, a drone roof inspection is now a practical option for homeowners in Whistler. Here’s why and how you can use a drone to assess your roof after heavy rain:
- Why Use a Drone?
Drones provide a bird’s-eye view of your roof without the risk of climbing. You can easily spot issues like cracked shingles, pooling water, or damaged flashing, even in hard-to-reach areas. This is especially helpful for steep or high roofs, which are common in many Whistler neighborhoods. - What to Look For During a Drone Roof Inspection
- Shingle Damage: Check for missing or lifted shingles that may have been affected by heavy rain.
- Gutters and Flashing: Look for debris or damage to critical components like gutters and flashing.
- Water Pooling: Identify flat areas where water might have been collected.
- How to Use a Drone Safely
- Make sure your drone is fully charged and equipped with a high-resolution camera.
- Practice flying in an open area before using it around your home.
- Avoid flying in strong winds or wet weather for safety and better footage quality.
- Benefits of Drone Roof Inspection
Not only is it safer, but it’s also efficient and cost-effective. With clear visuals, you can determine whether your roof needs minor fixes or professional help. Many roofing companies even offer free roof inspections using drones for a detailed assessment.
Using a drone is a great way to inspect your roof after heavy rain while staying safe. If you don’t own one, consider hiring a professional roofing service in Whistler that specializes in drone inspections. It’s a smart investment in keeping your home protected.
Look for Signs of Water Damage
After heavy rain, water damage can be one of the most serious issues your roof might face. During your roof inspection, make sure to look both inside and outside your home for clear signs of trouble. Here’s how:
Inside Your Home
- Check Ceilings and Walls
Look for water stains, discolored patches, or peeling paint on your ceilings and walls. These could indicate a roof leak that’s allowing water to seep inside. - Inspect the Attic
If your home has an attic, take a flashlight and check for damp spots, mold, or a musty smell. These are often signs of water entering through the roof.
Outside Your Home
- Examine the Roof Surface
Look for areas where water might have pooled after the rain. Pooling water can weaken your roof and lead to leaks over time. - Check Around Flashing and Chimneys
Flashing and seals around chimneys and vents are vulnerable points. Look for rust, cracks, or gaps where water could have entered.
Want More Tips on Checking for Damage?
For a complete guide on spotting roof issues, read this blog on 7 Vital Steps to Check for Roof Damage After a Storm. It offers expert advice and practical steps, especially for homeowners in Whistler rainy climate.
Why It’s Important
Water damage doesn’t just affect your roof—it can harm your entire home. If left unchecked, it can lead to structural issues, mold growth, and costly repairs. Addressing these problems early is key to keeping your home safe and dry.
Inspect Gutters and Downspouts
Your gutters and downspouts play a big role in protecting your roof and home from water damage. During your roof inspection, it’s essential to check them for issues caused by heavy rain. Here’s what to do:
Look for Blockages
- Check if leaves, dirt, or other debris are clogging the gutters. Clogged gutters can cause water to overflow and pool on your roof, leading to damage over time.
- Pay attention to downspouts—make sure they are clear so water can flow freely away from your home.
Inspect for Damage
- Look for cracks, rust, or loose sections in your gutters. Damaged gutters may not direct water properly, which could harm your roof and foundation.
- Check if the gutters are securely attached to your home. Heavy rain can loosen them, especially if they are carrying too much debris.
Watch for Overflow or Pooling Water
- After heavy rain, you might notice water marks or soil erosion near your home’s foundation. These signs often indicate that the gutters or downspouts aren’t working correctly.
- Pooling water can damage the roof’s edges, causing leaks and rot.
Why It’s Important
Gutters and downspouts are your roof’s first line of defense against water damage. Regular maintenance and inspection can prevent expensive repairs down the line. Studies show that improperly maintained gutters are one of the leading causes of roof damage in Whistler’s rainy climate.
If you find significant issues during your inspection, it’s a good idea to hire professionals for gutter cleaning or repairs. Many companies in Whistler offer this service alongside roof assessments, ensuring your home stays protected during heavy rain seasons.
Climb with Caution for a Closer Look
Sometimes, a ground-level roof inspection isn’t enough to catch all potential issues. If you feel confident and have the right safety equipment, climbing up for a closer look can help you assess your roof more thoroughly. Here’s how to do it safely:
1. Use Proper Safety Equipment
- Make sure your ladder is sturdy, positioned on solid ground, and extends at least three feet above the roofline.
- Wear non-slip shoes and consider using a safety harness, especially for steep or high roofs.
- Avoid climbing if the roof is still wet from rain, as it could be slippery.
2. Focus on Key Areas
- Shingles: Look for curled, cracked, or missing shingles. These are common signs of storm damage.
- Flashing: Inspect flashing around chimneys, vents, and skylights for rust, cracks, or gaps.
- Gutters: Check for debris or signs of water overflow near the roof’s edge.
- Soft Spots: Carefully test for weak or soft areas, which could indicate underlying water damage or rot.
3. Avoid Taking Risks
- If any part of your roof feels unstable, stop immediately. It’s not worth risking your safety.
- Remember, many roofing companies in Whistler offer a free roof inspection, which can save you time and ensure a thorough check without climbing.
Why It’s Important
While climbing for a closer look can help you spot hidden damage, safety should always come first. Falls from roofs account for a significant number of household accidents each year in Canada, particularly during maintenance tasks. (canada.ca)
If climbing feels unsafe or you’re unsure what to look for, rely on professional services for a detailed roof assessment. Keeping your roof in good shape is important, but protecting yourself is even more crucial.
When to Call for Professional Help
Sometimes, a DIY roof inspection isn’t enough. If you spot significant issues or feel unsure about your findings, it’s best to call a professional. Here’s when to seek expert help:
- Visible Signs of Damage
- If you notice missing shingles, sagging areas, or water pooling that you can’t address on your own.
- Persistent Leaks
- Water stains on your ceilings or walls that keep reappearing even after heavy rain.
- Structural Concerns
- If the roof feels soft or unstable underfoot, there might be deeper structural issues.
- Limited Access
- Hard-to-reach areas or steep roofs can make inspections dangerous. Professionals can safely use tools like drones for a detailed roof assessment.
Many roofing companies in Whistler offer a free roof inspection to evaluate the damage and provide repair recommendations. Don’t wait—early intervention can save you time, money, and stress in the long run.
CONCLUSION:
Conducting a roof inspection after heavy rain is an essential step to keep your home safe and dry. By following these steps—starting from the ground, using tools like drones, checking for water damage, and climbing carefully when needed—you can catch potential issues early and avoid costly repairs.
Remember, your safety comes first. If you spot serious problems or feel unsure about inspecting your roof, don’t hesitate to call a professional. Many Whistler roofing companies offer a free roof inspection, giving you peace of mind without the risks.
Taking the time to inspect your roof regularly helps protect your home from the challenges of Whistler’s rainy weather. Keep your roof in top shape, and your home will stay a safe, cozy place for years to come.